Creating an animal cell diagram is a great way to learn about the different parts and functions of a cell. To make your diagram, follow these steps:
- Gather your materials, including a blank paper, colored pencils, and a reference image of an animal cell.
- Start by drawing the cell membrane, the outer boundary of the cell.
- Add the nucleus, the control center of the cell.
- Include the mitochondria, which produce energy for the cell.
- Draw the endoplasmic reticulum, responsible for protein synthesis.
- Lastly, add the Golgi apparatus, involved in packaging and processing proteins.
When it comes to understanding the intricacies of an animal cell, creating a diagram can be a helpful tool. Did you know that an animal cell is so small that it cannot be seen with the naked eye? That’s right! Despite its microscopic size, an animal cell is packed with vital components that enable it to function properly. To gain a deeper understanding of the inner workings of an animal cell, creating a diagram is an effective way to visualize its various parts and their functions.
Creating an animal cell diagram can provide valuable insights into the history and background of cell biology. In fact, the study of cell structure dates back to the 17th century when the first microscopes were developed. Since then, scientists have made numerous discoveries about the different organelles within animal cells. For example, did you know that the mitochondria, often referred to as the powerhouse of the cell, are responsible for generating energy? By creating a detailed animal cell diagram, you can showcase these crucial components and their important roles, helping to enhance your understanding of cell biology.

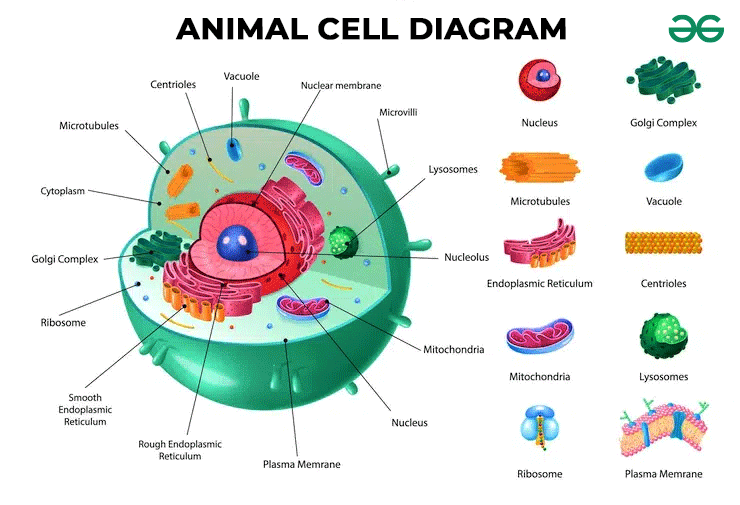
Understanding the Anatomy of an Animal Cell
An animal cell is the fundamental building block of all animals, including humans. It is a complex and intricate structure that plays a vital role in the functioning of living organisms. To understand the workings of an animal cell, it is crucial to have a clear diagram that illustrates its various components and their functions. In this article, we will explore the process of creating an animal cell diagram, step by step.
Before diving into the process of creating an animal cell diagram, it is important to have a basic understanding of the different parts of an animal cell. The following are the main components:
- Cell Membrane
- Cytoplasm
- Nucleus
- Endoplasmic Reticulum
- Golgi Apparatus
- Mitochondria
- Lysosomes
- Ribosomes
- Cytoskeleton
Each of these components has a specific function and plays a crucial role in the overall functioning of the cell. The cell membrane, for example, acts as a protective barrier, regulating the movement of substances in and out of the cell. The nucleus is the control center of the cell, housing the genetic material and overseeing cell activities. The mitochondria serve as the powerhouses of the cell, generating energy through cellular respiration.
To gain a deeper understanding of the structure and functions of an animal cell, it is essential to create a diagram that visually represents each component. This diagram can serve as a valuable tool for studying and identifying different parts of the cell. Let’s explore how to create an accurate and detailed animal cell diagram.
Step 1: Gather the necessary materials
Before starting the diagram, make sure you have all the necessary materials at hand. You will need a clean sheet of paper, a pencil or pen, a ruler, and colored pencils or markers for labeling the various components of the cell. Having these materials ready will ensure a smooth and organized process.
Step 1.1: Choose the size of your diagram
Decide on the size of your diagram based on your preference and the amount of detail you want to include. It can be a small diagram that fits on a regular sheet of paper or a larger diagram that spans multiple sheets. Consider the level of intricacy you want to achieve and the amount of space you have available.
Step 1.2: Prepare the paper and ruler
Take the clean sheet of paper and use the ruler to draw straight lines to create a grid-like structure. This will help you maintain symmetry and proportions while drawing the various components of the animal cell. Make sure the lines are faint enough to be erased later, as they are just guidelines for your diagram.
Once the grid is ready, use the ruler to create a border around the edges of the paper. This will give your diagram a neat and finished look.
Step 2: Outline the main components of the animal cell
Start by drawing an outline of the animal cell on your paper. Use simple shapes such as circles or ovals to represent the different parts of the cell. Begin with the cell membrane, which forms the outer boundary of the cell. It should enclose the entire diagram.
Next, draw a smaller circle or oval inside the cell membrane to represent the nucleus. The nucleus is usually located near the center of the cell and is one of the most important components.
Continue adding the other main components of the cell, such as the endoplasmic reticulum, Golgi apparatus, mitochondria, lysosomes, ribosomes, and cytoskeleton. Place them in their respective locations within the cell, making sure to leave enough space for labeling later.
Remember, the size and shape of each component should be proportional and accurately represent their relative sizes within the cell. Use the grid lines as reference points to ensure proper placement and symmetry.
Step 2.1: Add details to the main components
Once you have the basic outline of the main components, start adding more details to each part. Use your pencil or pen to add finer lines and shapes that depict the intricacies of the cell structures.
For example, the endoplasmic reticulum can be represented by a series of interconnected tubes or sacs within the cell. The Golgi apparatus can be represented by a stack of flattened sacs near the nucleus. Add these details to enhance the accuracy and realism of your diagram.
Step 3: Label the components of the animal cell
Once you have outlined and detailed the main components of the animal cell, it is time to label each part. Use your colored pencils or markers to add labels next to each structure. Write the name of the component neatly and clearly for easy identification.
You can also use different colors for each structure to create a visually appealing and informative diagram. Choose colors that stand out and effectively differentiate between the various components.
In addition to labeling the structures, consider adding arrows or lines to indicate the movement or direction of certain processes within the cell. This can further enhance the clarity and understanding of your diagram.
Step 3.1: Include additional information
Along with labeling the components, you can also include additional information about each structure. Write a brief description or function next to each label to provide a comprehensive understanding of the cell.
For example, next to the nucleus label, write a sentence describing its role as the control center of the cell and mention that it contains the genetic material. This additional information can be especially helpful for those studying or learning about animal cells for the first time.
Step 4: Review and refine your animal cell diagram
After completing the initial diagram, take a step back and review your work. Check for any inaccuracies or inconsistencies in the placement, proportions, or labeling of the components. Make any necessary adjustments or refinements to ensure the diagram accurately represents the anatomy of an animal cell.
If you notice any mistakes or errors, use an eraser to correct them and create a clean and polished final version of your diagram. This attention to detail and precision will enhance the clarity and educational value of your animal cell diagram.
In Conclusion
Creating an animal cell diagram can be a valuable learning tool and a visually appealing way to understand the intricate workings of a cell. By following the steps outlined in this article, you can create a detailed and accurate diagram that showcases the various components and functions of an animal cell. Remember to gather the necessary materials, outline and detail the main components, label each structure, and review and refine your diagram for accuracy. With a well-crafted animal cell diagram, you can enhance your understanding of biology and gain a deeper appreciation for the complexity of life.
| References: |
| 1. Cell Structure and Functions. (n.d.). Retrieved from https://www.ncbi.nlm.nih.gov/books/NBK9877/ |
| 2. Animal Cell Structure. (n.d.). Retrieved from https://www.ncbi.nlm.nih.gov/books/NBK8824/ |
Frequently Asked Questions
Here are some common questions and answers related to animal cell diagrams:
1. How do I create an animal cell diagram?
To create an animal cell diagram, you can follow these steps:
First, gather all the necessary materials, including a blank piece of paper, colored pencils or markers, and a reference image or diagram of an animal cell.
Next, start by drawing the outer boundary of the cell using a light pencil. Then, draw in the nucleus, which is typically located near the center of the cell.
After that, add other organelles such as mitochondria, endoplasmic reticulum, Golgi apparatus, and lysosomes according to their specific locations within the cell.
Finally, use different colored pencils or markers to fill in and label each organelle, making the diagram clear and easy to understand.
2. What are the key components of an animal cell diagram?
An animal cell diagram typically includes the following key components:
– Outer boundary: Represents the cell membrane that encloses the cell.
– Nucleus: The control center of the cell containing the genetic material.
– Cytoplasm: The gel-like substance that fills the cell and holds the organelles.
– Mitochondria: Organelles that produce energy for the cell.
– Endoplasmic reticulum: Involved in the production and transportation of proteins and lipids.
– Golgi apparatus: Responsible for sorting and packaging proteins for transport within the cell or outside of it.
– Lysosomes: Contain enzymes that break down waste materials and cellular debris.
3. Why are animal cell diagrams important?
Animal cell diagrams are important because they visually represent the different organelles and structures within a cell, helping us understand the complex organization and functions of cells. They are useful for educational purposes, such as teaching biology, as well as for scientific research and study.
These diagrams provide a clear representation of cellular components, allowing scientists and students to study and learn about cell structure and function more effectively. They also serve as a reference for comparing and analyzing the similarities and differences between different types of animal cells.
4. Where can I find animal cell diagrams for reference?
You can find animal cell diagrams for reference in various places:
– Online educational websites and biology-related resources often provide free access to animal cell diagrams.
– Textbooks and reference books on biology or cell biology typically contain detailed diagrams and illustrations of animal cells.
– Educational institutions, such as universities or schools, often have biology departments with resources that include visual aids like animal cell diagrams.
– Science museums and exhibits may also have displays or interactive exhibits featuring animal cell diagrams.
5. How can animal cell diagrams be used in education?
Animal cell diagrams have several educational applications:
– They can be used by teachers to facilitate lessons on cell biology and help students understand the structure and function of animal cells.
– Students can use animal cell diagrams as study aids to review and memorize the different organelles and their functions.
– Comparative analysis of animal cell diagrams can help students understand the similarities and differences between different types of animal cells, such as epithelial cells, muscle cells, or nerve cells.
– Animal cell diagrams can also be utilized in research projects or presentations to visually communicate findings or concepts related to cellular biology.
To create an animal cell diagram, start by drawing a circle to represent the cell’s outer boundary. Then, divide the circle into smaller sections to depict the different organelles within the cell.
Label each organelle and include brief descriptions of their functions. Use simple shapes and colors to make the diagram easy to understand. Lastly, don’t forget to add a key or legend to explain the symbols used in the diagram.